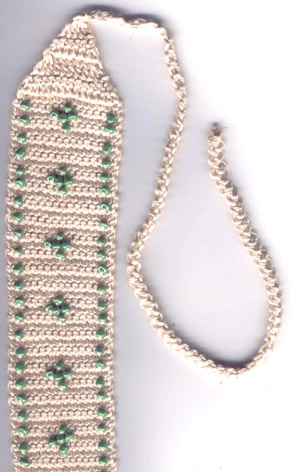
Undisthreadness

Monday, February 20, 2006

Beaded Headband


Note: I found an error in the bead graph. It's corrected now. Excuse me for any inconveniency.

Materials:
Anne thread (similar to Pearl cotton nr. 3), off-white or light beige.
Crochet hook 1,75 mm
152 3-mm seed beads, pearly green.

Size: the sc part is 4.5 cm (1.8") width, 33 cm (13") long.

Abbr.: st (stitch), yo (yarn over), inc (increase), dec (decrease), ch (chain), sc (single crochet), dc (double crochet).

Before you begin crocheting, string all beads in the thread. It's better to string some beads more; I stringed about 160 beads. If you string less beads, you'll have to cut the thread, string more beads and tie the thread again - a tiresome task.

First you make the tying string. You can make a simple chain, but I used a cord pattern from an old crochet book. I'll try to describe it.

You begin chaining 2 stitches; in the second ch from hook you make a sc. Turn the work and look at the stitch you've made. Under the two top loops, you'll see 2 lateral loops. Insert the hook into these two lateral loops and make a new sc. It's a bit difficult to identify these two lateral loops in the first row, but it won't matter if you don't insert your hook into the right loops. Turn the work. Now it'll be easier to see the 2 lateral loops; insert your hook into them and make a new sc. Turn the work.

You can find a good step-by-step picture explanation at the German site Teddy's Handarbeiten.

Keep working this way until the cord has the desired length (mine has 37 cm - 14.5 inches.)

Then ch 3 (= 1 dc), 4 dc in the same stitch (total 5 dc). Turn.
Ch 3 (= 1 dc), 1 dc in the first st, 3 dc, 2 dc in the last st (= 7 dc). Turn.
Ch 3 (= 1 dc), 2 dc in the first st, 5 dc, 3 dc in the last st (= 11 dc). Turn.
Ch 3 (= 1 dc), 1 dc in the first st, 9 dc, 2 dc in the last st (= 13 dc). Turn.
Ch 3 (= 1 dc), 1 dc in the first st, 11 dc, 2 dc in the last st (= 15 dc). Turn.

Now you'll begin to follow the graph. Working in sc, make the first row in plain sc - it's the right side of the headband.

Turn the work, ch 1, 1 sc, then insert the hook in the previous row stitch, yo, pull a loop, pull a bead until it's next to the crochet, yo (catching the thread next to the bead) and pull the loop through the two loops in the hook. Keep working in sc, with a bead in the middle of the row and another in the stitch next to the last one.

The next row is a right side row. First, 6 plain sc. Now, to fix a bead to a right row st you need to insert the hook FROM BACK TO FRONT, yo and pull the loop FROM FRONT TO BACK; the thread will be at the front side of the work. Pull the bead next to the work, yo next to the bead, pull the loop through the 2 loops in the hook. You'll get a twisted stitch, but never mind. Make more two beaded twisted sc and then 6 plain sc.

The 4th row is similar to the 2nd row.

Keep following the graph and repeat the part marked with "repetir' (repeat in Portuguese) until you have 12 5-beads groups. Make one more plaln sc row then work the decreasing dc rows: dec 1 st at each side of the 1st row (13 st), 1 st at each side of the 2nd row (11 st), 2 st at each side of the 3rd row (7 st), 1 st at each side of the 4th row (5 st) then make a group of 5 st together, keeping in the hook the last loops of each stitch, then yo and pull the loop through all loops in the hook.

Then you'll work the second tying string - make the same cord or chain you made at the beginning. Finish off.

I like these tied headbands better than the ones with elastic.

Thursday, February 16, 2006

Litle Granny Square Heart


I wanted a little pretty something to send to my partners in the Granny Square Exchange of the Brazilian list crocheterapia. Then I had this idea, which relates to grannies AND love.

I used Pearl cotton nr. 8 and a 1 mm steel hook.

Measurements: 2,2" width, 2" height

Abbr: ch (chain),. ss (slip stitch), sc (single crochet), dc (double crochet), tr (treble crochet), picot (ch 3, sc on top of previous stitch).

Ch 5, join with ss to make a ring.

1st round: Ch 3, 2 dc in the ring, *ch 2, 3 dc in the ring*, repeat from * to * twice more, ch 1, sc in the 3rd beginning ch (this pb substitutes the 2nd ch and as such must be treated.)

2nd round: Ch 3, 2 dc in the same corner loop (insert hook under the last sc of the previous row, as if it was a chain), *ch 1, [3dc, ch 2, 3 dc] in the next 2-ch loop (corner made)*, repeat from * to * twice more, ch 1, 3 dc in the last 2-ch loop, ch 1, 1 sc in the 3rd beginning chain.

3rd round: Ch 3, 2 dc in the same corner loop, *ch 1, 3 dc in next loop, ch 1, corner in the next loop* , repeat from * to * twice more, ch 1, 3 dc in next loop, ch 1, 3 dc in last loop, ch 2, slip stitch in the 3rd beginning chain.

Shape the heart. †Slip stitch on the next 2 st; ch 1, skip 3 st, in the next st (the center dc of the 3-dc group in the middle of the square side) make [1 dc, ch 1] 5 times, ch 1, skip 3 st, ss in the next st and in the next 3 st; ch 1, turn the work; tr in the ch loop, *ch 1, tr in the next st, ch 1, tr in the next ch loop*, repeat from * to * 4 times more (11 tr), ch 1, ss in the next corner loop†. Don't turn the work; repeat from †to†.

Don't turn the work to make the finishing row. Sc in each of the next 5 stitches (trebles or loops); *1 picot, skip 1 st, 3 sc*, repeat from * to * until the corner loop at the tip of the heart, picot, sc in the same loop and go back the same way, symmetrically, ending with a slip stitch in the beginning of the row. Finish off.

Pretty, huh?

Sunday, February 12, 2006

Brown Cell Cover


After many sunny and rainy days full of work, I got a little time to update my blog.

Since the blue cover is a bit too flashy, I choose to make a soberer one - I used brown thread, not that I particularly love brown, but because for a lot of random reasons I have quite a few brown pants.

To brighten it up a little, I thought: why don't add color using the peruvian or tapestry technique of jacquard crochet? So I graphed a simple diamond pattern and choose light beige, burgundy and dusty green as the secondary colors.

The pattern follows the general guidelines of the blue cell cover; I used dark brown Anne thread (Anne is a Brazilian thread similar to Pearl cotton nr. 3) and a 1.75 mm hook.

Beginning with 4 chains, I made 12 straight sc rows then a circular row of sc around this rectangle - 12 sc on the long side, 4 on the other side of the beginning chain, 12 on the other long side, 4 to the end - 32 sc. I didn't finished the round with a slip stitch; just marked the first stitch (I use a paper clip, any method will do, even a piece of different color thread) and kept working in continuous rounds.

So, on the second circular round I began to follow the graph. The peruvian jacquard technique consists in working the single crochets of one color over the other color thread, inserting the hook through both strands of the previous row stitches. This way you won't have "loose" threads on the wrong side of the work to mess up the keyboard of your cell phone. As in all multicolored crochet work, you finish a stitch with the thread of the next color.

When I ended working the graph, I kept making sc rounds with the brown thread. Since jacquard sc is more "tight" than dc, I felt the need to increase the number of stitches to accommodate my cell phone shape. So I increased 1 st at each "corner" of the cover, getting a total of 36 stitches this way. I kept working on them until the 28th round.

To finish the 28th round I used a slip stitch on the next st; then I chained 1, turned the work and began to make the flap.

The brown cover flap is shorter than the blue one, to avoid covering the jacquard part. See the pattern for the blue cell phone cover; in the brown one, I began to decrease at the 22nd row. I used the same brown thread to make the finishing row around the flap with the button loop.

This time I used a coconut little button: the right size, the right color, the right look.

The belt strap is the same as in the blue cell phone cover.

I sewed a little dark metal ring in each side of the cover and made a long strap (128 4-dc rows); put a "mosquetao" (what's the name of this little hook in English? See the photo) at each end and now I have a versatile cell phone cover. I can hang my phone or use it in my belt.